Table of Contents
- The problem: your scripts stop running whenever Chrome auto-updates
- Implementation: automating driver retrieval (a quick walkthrough of the code)
- How to use it
- Wrapping up
The problem: your scripts stop running whenever Chrome auto-updates
When Selenium won’t start, 99% of the time the cause is a version mismatch between Chrome and ChromeDriver.
Chrome updates itself automatically—and far more often than you’d expect.
ChromeDriver doesn’t. So a script that ran fine yesterday can be broken by the next morning, failing with an error like this:
selenium.common.exceptions.SessionNotCreatedException:
Message: session not created:
This version of ChromeDriver only supports Chrome version 149
Current browser version is 150.0.xxxx.xx
Fixing it by hand means checking your Chrome version, downloading the matching ChromeDriver from Chrome for Testing, and replacing the existing file.
Even though you only have to do this when the major version bumps, it’s a real hassle.
Some people avoid the whole thing by force-disabling Chrome’s automatic updates.
(How to stop Google Chrome from updating automatically)
Recent versions of Selenium (4.6.0 and later) will actually download a driver matching your installed Chrome automatically. (I only found this out after building the tool. Somebody should have told me! You’d think that’s the kind of thing you’d mention up front!)
So before anything else, try this:
Reference: (Selenium 4.6 bundles the driver, and 4.11 even bundles the browser)
from selenium import webdriver

driver = webdriver.Chrome()  # Do not specify the driver path
driver.get("https://mitz17.com")
time.sleep(5)
driver.quit()
If that works, you can stop reading here.
That said, there are still cases where you need to manage the driver yourself, such as:
- You want to explicitly check the Chrome and ChromeDriver versions before Selenium starts
- You want to pin down where the driver is stored
- You’re stuck using an old version of Selenium
For those situations, I built a tool that fetches the driver automatically.
Supported OS: Windows, Ubuntu, macOS
The full source is on GitHub: mitz17/get-chrome-driver
Note: The information in this article is current as of July 2026.
Implementation: automating driver retrieval (a quick walkthrough of the code)
The process runs in five stages: “detect Chrome → query the API → check the cache → extract → verify startup.”
1. Detect the installed Chrome version
On Windows, it checks the registry (HKCU:\Software\Google\Chrome\BLBeacon) and the product version of chrome.exe. On Linux and macOS, it tries a list of candidate commands in order.
commands = [
    "google-chrome",
    "google-chrome-stable",
    "chromium",
    "chromium-browser",
]

for command in commands:
    try:
        output = subprocess.check_output([command, "--version"]).decode().strip()
        match = re.search(r"[\d.]+", output)
        if match:
            version = match.group(0)
            break
    except (subprocess.CalledProcessError, FileNotFoundError):
        continue
2. Find the download URL from the Chrome for Testing API
It fetches known-good-versions-with-downloads.json and scans from the end for an entry whose major version matches Chrome’s. In the JSON, the OS and CPU are identified by five keys: linux64, mac-arm64, mac-x64, win32, and win64. The tool builds the matching string from platform.system() and platform.machine(), then looks for it.
def _extract_from_versions(entries, major_version, platform_name):
    for entry in reversed(entries):
        version = entry.get("version", "")
        if not version.startswith(f"{major_version}."):
            continue

        downloads = entry.get("downloads", {}).get("chromedriver", [])
        for download in downloads:
            if download.get("platform") == platform_name:
                return version, download.get("url")

    return None, None
3. Reuse the saved driver
If the major version of the saved driver already matches Chrome, use it as-is.
existing_version = self._get_installed_driver_version()
target_major = version.split(".")[0]

if existing_version:
    existing_major = existing_version.split(".")[0]
    if existing_major == target_major and self.driver_path.exists():
        print(f"Existing ChromeDriver version {existing_version} is compatible.")
        return str(self.driver_path)
The save location is set to ~/.get-chrome-driver/.
4. Extract only the executable from the ZIP
Extracting the whole ZIP with extractall() is risky: if paths inside the archive contain ../ or absolute paths, files can end up written somewhere you didn’t intend. This is the so-called Zip Slip vulnerability.
So instead, the code inspects each entry’s path and stream-copies just the single file named chromedriver (or chromedriver.exe).
with zipfile.ZipFile(io.BytesIO(response.content)) as archive:
    driver_member = None

    for member in archive.infolist():
        member_path = os.path.normpath(member.filename)
        if os.path.isabs(member_path) or member_path.startswith(".."):
            continue
        if os.path.basename(member_path) == self.driver_name:
            driver_member = member
            break

    with archive.open(driver_member) as source, open(self.driver_path, "wb") as target:
        shutil.copyfileobj(source, target)
On Linux and macOS, it also grants execute permission.
if os.name != "nt":
    self.driver_path.chmod(0o755)
The default save location for each OS is as follows.
| OS | File name | Save location |
|---|---|---|
| Windows | chromedriver.exe | C:\Users\<username>\.get-chrome-driver\ |
| Ubuntu / macOS | chromedriver | /home/<username>/.get-chrome-driver/ |
5. Verify that it actually starts
Finally, it launches headless Chrome and confirms that a session can be created.
options = Options()
options.add_argument("--headless")
options.add_argument("--no-sandbox")
options.add_argument("--disable-dev-shm-usage")

service = Service(executable_path=driver_path)
driver = webdriver.Chrome(service=service, options=options)

try:
    driver.get("https://google.com")
    print(driver.title)
finally:
    driver.quit()
How to use it
0. What you’ll need
- Python 3.8 or later
- Google Chrome
- git
1. Download
git clone https://github.com/mitz17/get-chrome-driver.git
cd get-chrome-driver
Run through the cd, then do all your work inside this folder from here on.
2. Create a virtual environment
A virtual environment (venv) isolates this tool’s libraries from the rest of your system. It’ll work without one, but creating one is recommended, since it prevents version conflicts with your other Python projects.
python -m venv .venv
Once it’s created, you need to “activate” it. The command depends on your OS.
# Windows (PowerShell)
.\.venv\Scripts\Activate.ps1
# macOS / Linux
source .venv/bin/activate
When activation succeeds, (.venv) appears at the start of your prompt—that’s how you know it worked. It deactivates when you close the terminal, so you’ll need to activate it again next time you work.
3. Install the required libraries
python -m pip install -r requirements.txt
This installs everything listed in requirements.txt (including Selenium) in one go.
4. Call it from your own script
This is the main event. A single call to install() handles detection, retrieval, caching, and startup verification, then returns the ChromeDriver path. Pass that path to Service.
from get_chrome_driver.core import GetChromeDriver
from selenium import webdriver
from selenium.webdriver.chrome.service import Service

# Prepare ChromeDriver and get its path back
installer = GetChromeDriver()
driver_path = installer.install()

service = Service(executable_path=driver_path)
driver = webdriver.Chrome(service=service)

try:
    driver.get("https://mitz17.com")
    print(driver.title)
    # Write whatever you want to automate here
finally:
    driver.quit()  # Always close it
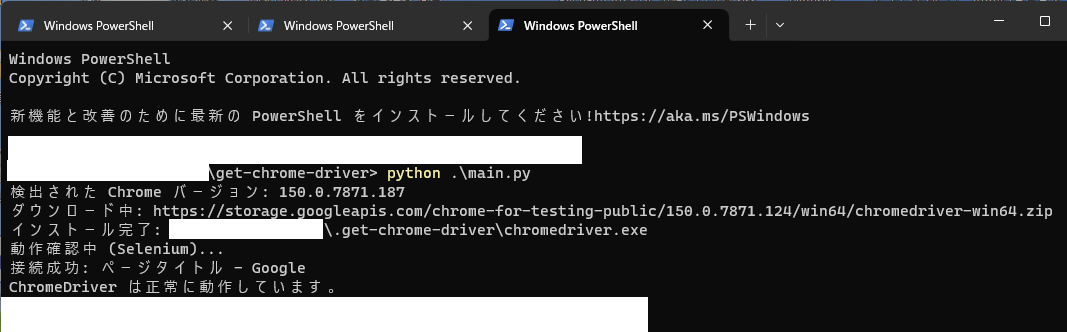
On the first run, the ChromeDriver matching your Chrome version is downloaded and saved.
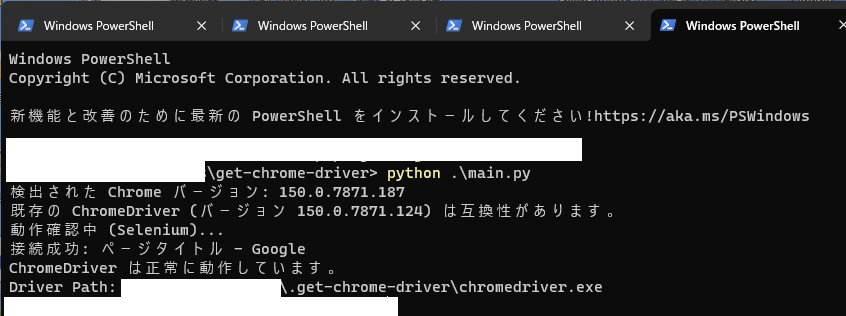
On every run after that, the saved ChromeDriver is reused, so nothing is downloaded.
It’s important to wrap your code in try/finally and put driver.quit() in the finally block. If an error occurs partway through and quit() never runs, the Chrome process is left alive. In a script that runs on a schedule, these orphaned processes pile up and can eventually eat all your memory.
Since the ChromeDriver location is fixed, there’s no need to add it to your PATH.
Wrapping up
I sincerely hope this improves everyone’s QOSL.